VPC
A VPC (virtual private cloud) is a logically isolated section of the cloud that allows you to define your own virtual network (similar to having your own router and switches on premise). We will take advantage of VPC to create our own public and private subnets, which will contain our servers, database, load balancer, etc.
For this example VPC, I picked a Class A IP address pool of 10.42.0.0/16. You can pick any Class A or Class B /16 subnet that you wish. However, if you plan to setup a VPN into your VPC, make sure the pool doesn’t conflict with an IP addresses on your other networks.
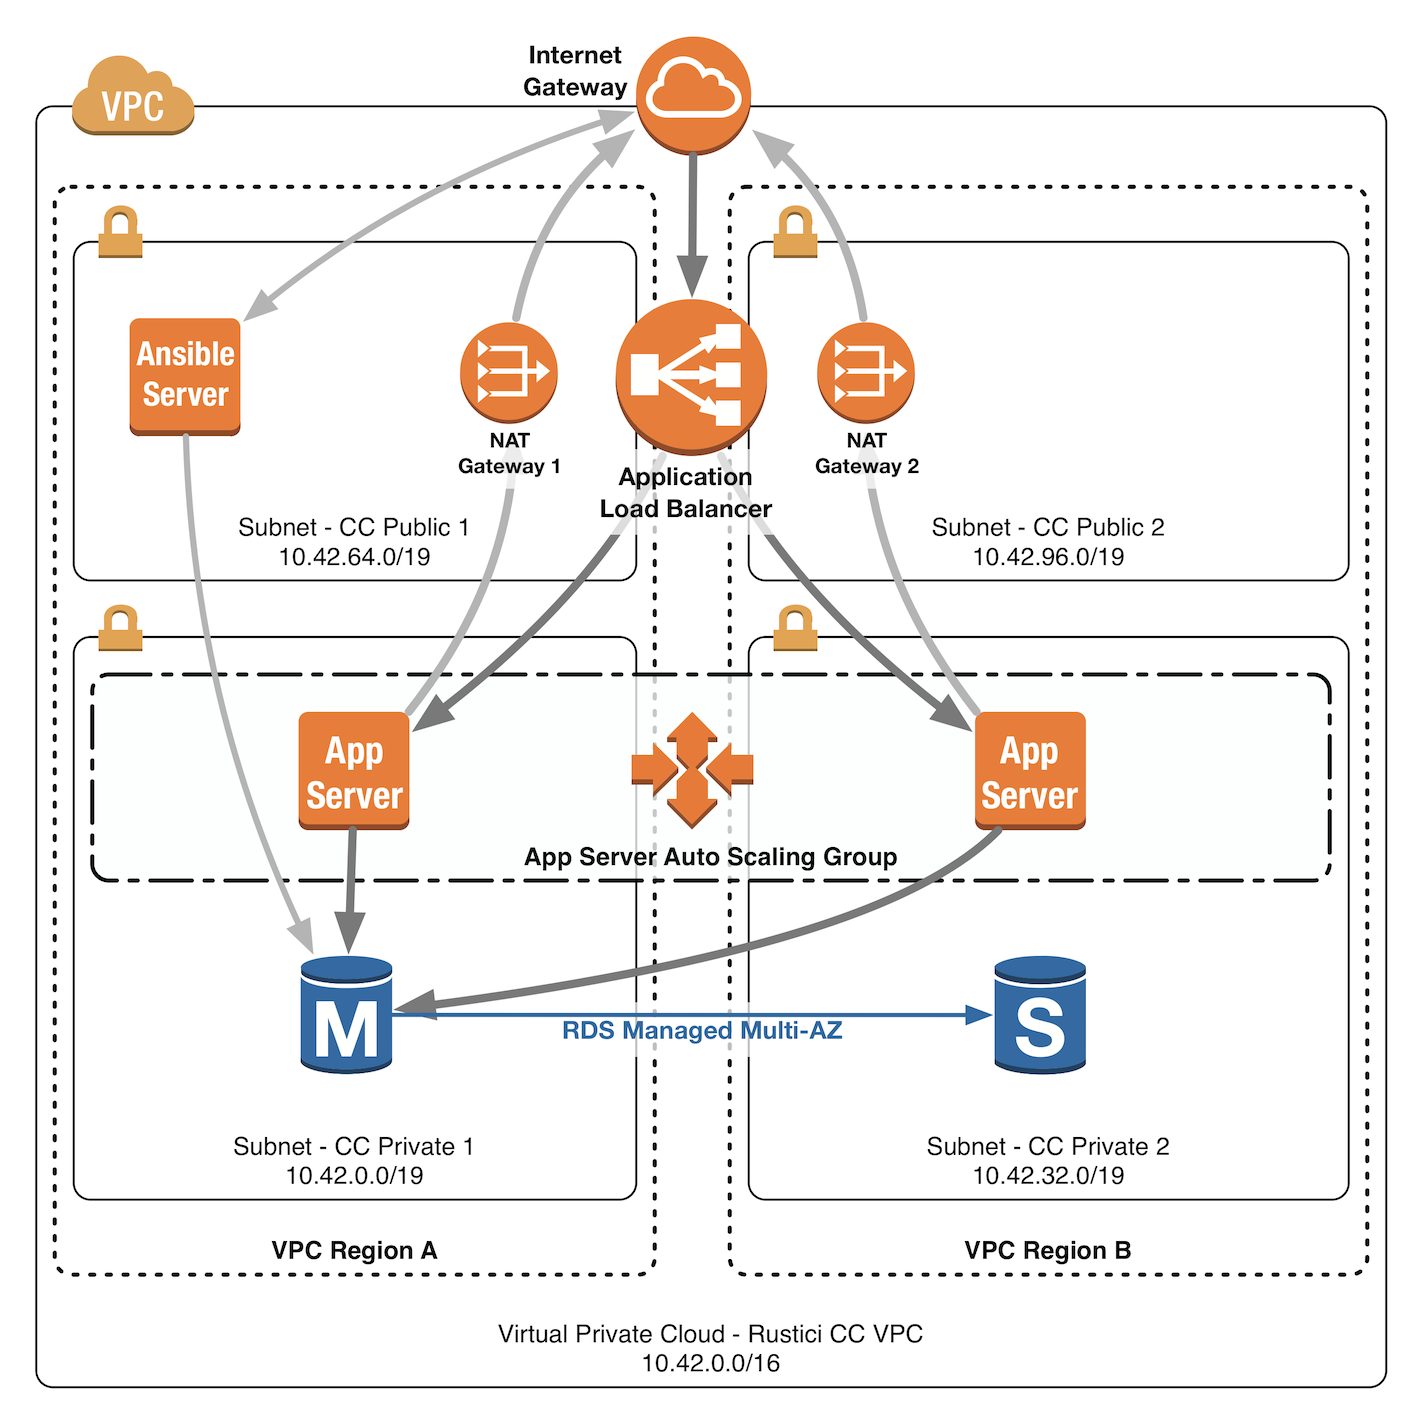
Below is a diagram of the network we will define.
Go to Services -> VPC
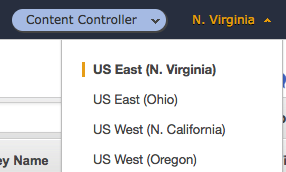
- Choose your preferred region from the top right corner of the screen. We’re going to choose US East (N. Virginia), so all of our availability zone settings will be prefixed with ‘us-east-1’. See the AWS Regions and Availability Zones docs for more details. Keep in mind that pricing varies between regions.
- Choose Your VPCs on the left sidebar, and then click the blue Create VPC button.
- Enter a name and IPv4 CIDR block and click Yes, Create. If you aren’t sure what to enter here, use
Rustici CC VPCand10.42.0.0/16.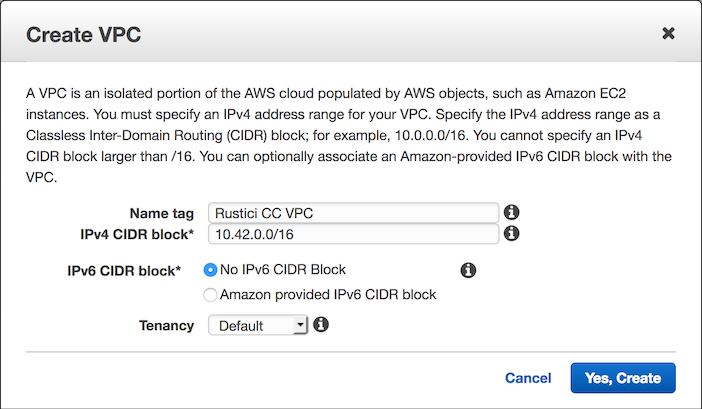
- Your VPC should now appear in the list of VPCs. Select it, click Actions -> Enable DNS Hostnames. Choose Yes and click Save.
Subnets
Next, we’ll create subnets for your new VPC. You may do this however you like, but you’ll need at least 2 public subnets in different availability zones and 2 private subnets in different availability zones. To keep things simple, we’re going to create 2 public subnets in zone a and zone b and 2 private subnets in zone a and zone b.
- Select Subnets on the left sidebar, and then click the blue Create Subnet button.
- Select the VPC that you created earlier (such as
Rustici CC VPC), fill out the rest of the details, and click Yes, Create. If you aren’t sure what to enter here, create 4 subnets with the following values:
| Name tag | Availability zone | IPv4 CIDR block |
|---|---|---|
| CC Private 1 | us-east-1a | 10.42.0.0/19 |
| CC Private 2 | us-east-1b | 10.42.32.0/19 |
| CC Public 1 | us-east-1a | 10.42.64.0/19 |
| CC Public 2 | us-east-1b | 10.42.96.0/19 |

The important thing here is that you pick 2 availability zones, and you create 1 public and 1 private subnet in each of the 2 zones. We used /19 subnets, so you will have room for up to 4 more /19 subnets in your /16 in the future.
You should now see a list containing the 4 subnets you just created.

Internet Gateways
Now, we need to create an Internet Gateway for your VPC.
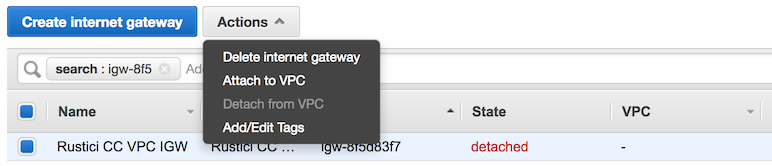
- Select Internet Gateways on the left sidebar, and then click the blue Create internet gateway button.
- Name the gateway and click Create. If you aren’t sure what to enter here, use
Rustici CC VPC IGW. - You will be taken back to the list of gateways. Check the box beside the gateway that you just created, and click Actions -> Attach to VPC. Select the VPC that you created earlier (
Rustici CC VPCor the name you chose), and then click Attach.
NAT Gateways
Since our private subnet instances will not have public IP addresses, their traffic will have to pass through a NAT gateway in order to access the internet. The NAT gateways will go in the public subnets, and outbound traffic from the private subnets will be routed to those NAT instances.
- Select NAT Gateways on the left sidebar, and then click the blue Create NAT Gateway button.
- Choose your first public subnet (
CC Public 1). - Click Create New EIP (This is the public IP address that outbound traffic will masquerade as).
- Click Create a NAT Gateway.
- Click Close (We’ll edit the route tables later).
- Rename the NAT gateway you just created to
CC Private 1 NAT. - Repeat these steps again to create a second NAT gateway, but this time choose your second public subnet (
CC Public 2) and name itCC Private 2 NAT.
Route Tables
Currently, all of our subnets have the same route table. This won’t work, because we need the private subnet traffic to flow through a NAT gateway, since those instances won’t have a public IP address. To fix this, we’ll create 2 new route tables (1 for each private subnet).
Public Route Table
The public route table will keep all local VPC traffic inside the VPC, and it will direct all outgoing traffic to the internet gateway. When your VPC was created, it also created a default route table. We’ll start out by editing that one.
- Select Route Tables on the left sidebar. Find the route table associated with your VPC (It will say
Rustici CC VPCor the name you chose under the VPC column) and change its name toCC Public Routes. - Select the route table. At the bottom of the screen, a panel will appear with some tabs. The Routes tab should be selected. Click the Edit button.
- Click Add Another Route.
- In the boxes that appear, set
0.0.0.0/0for the destination and chooseRustici CC VPC IGWfor the target, and click Save.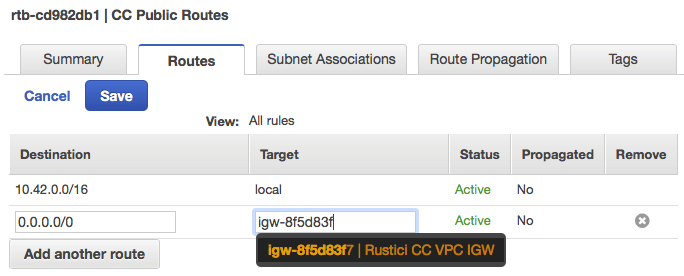
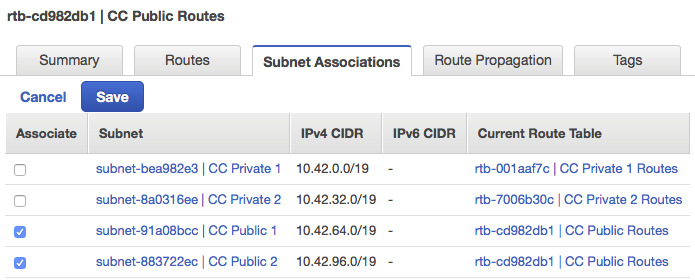
- Click on the Subnet Association tab and click Edit.
- Check the boxes beside both both public subnets and click Save.
Private Route Table
The private route table will keep all local VPC traffic inside the VPC, and it will direct all outgoing traffic to the NAT instance located in the public subnet. We’ll create 2 route tables so that each private subnet directs traffic to the NAT instance in the public subnet in the corresponding availability zone.
- Select Route Tables on the left sidebar and click Create Route Table.
- Enter
CC Private 1 Routesfor the name tag, chooseRustici CC VPCfor the VPC, and click Yes, Create. - The new route table should be selected, if it isn’t, then go ahead and select it. Select the Routes tab and click Edit.
- Click Add Another Route.
- In the boxes that appear, set
0.0.0.0/0for the destination and choose theCC Private 1 NATfor the target, and click Save. Note: AWS does not show the Name for NAT gateways, so you’ll need to open the NAT Gateways tab on the side and take note of the IDs. - Click on the Subnet Association tab and click Edit.
- Check the box beside only the
CC Private 1subnet, and click Save. - Repeat steps 1-7, but this time use
CC Private 2andCC Private 2 NATinstead.
Security Groups
We’ll create some security groups to make sure only traffic we want is allowed to flow. The goal here is to keep the potential attack surface as small as possible, so the only traffic that will be allowed from the outside world is HTTPS to the load balancers and SSH to the Ansible control box.
Create security groups
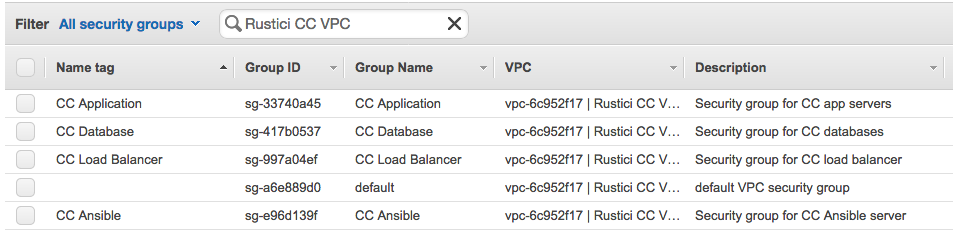
- Select Security Groups on the left sidebar.
- For each of these rows click Create Security Group, enter the values, and click Yes, Create.
| Name tag | Group name | Description | VPC |
|---|---|---|---|
| CC Database | CC Database | Security group for CC databases | Rustici CC VPC |
| CC Application | CC Application | Security group for CC app servers | Rustici CC VPC |
| CC Ansible | CC Ansible | Security group for CC Ansible server | Rustici CC VPC |
| CC Load Balancer | CC Load Balancer | Security group for CC load balancer | Rustici CC VPC |
You should now have 5 security groups (1 default and the 4 we just created) for the Rustici CC VPC
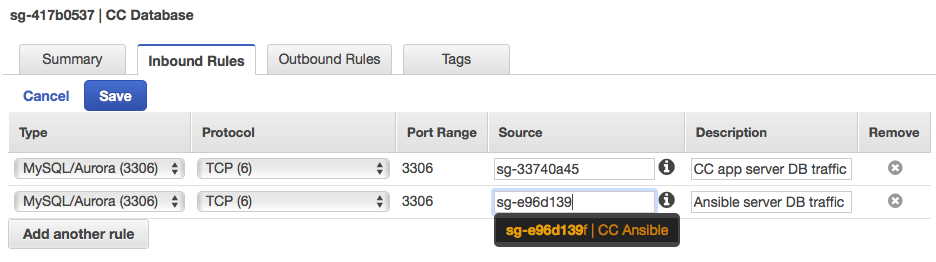
CC Database
Add rules to allow incoming DB traffic from CC Application and CC Ansible.
- Select the
CC Databasesecurity group from the list. - Click the Inbound Rules tab and click Edit.
- Choose MySQL/Aurora (3306) for the type, choose
CC Applicationfor the source, and enterCC app server DB trafficfor the description. - Click Add another rule
- Choose MySQL/Aurora (3306) for the type, choose
CC Ansiblefor the source, and enterAnsible server DB trafficfor the description. - Click Save
CC Application
Add rules to allow incoming HTTP traffic from CC Load Balancer and all incoming traffic from CC Ansible. Add a rule to allow outgoing DB traffic to CC Database.
- Select the
CC Applicationsecurity group from the list. - Click the Inbound Rules tab and click Edit.
- Choose HTTP (80) for the type, choose
CC Load Balancerfor the source, and enterLoad balancer HTTP trafficfor the description. - Click Add another rule.
- Choose ALL Traffic for the type, choose
CC Ansiblefor the source, and enterAnsible trafficfor the description. - Click Save.
- Click the Outbound Rules tab, and click Edit.
- Click Add another rule.
- Choose MySQL/Aurora (3306) for the type, choose
CC Databasefor the destination, and enterCC app to DB trafficfor the description. - Click Save.
CC Load Balancer
Add rules to allow all incoming traffic (per AWS docs). Add a rule to allow outgoing HTTP traffic to CC Application.
- Select the
CC Load Balancersecurity group from the list. - Click the Inbound Rules tab and click Edit.
- Choose ALL Traffic for the type and enter
0.0.0.0/0for the source. - Click Save.
- Click the Outbound Rules tab, and click Edit.
- Remove all existing rules, and then click Add another rule.
- Choose HTTP (80) for the type, choose
CC Applicationfor the destination, and enterLoad balancer to CC app trafficfor the description. - Click Save.
CC Ansible
Add a rule to allow incoming SSH traffic. Add rules to allow outdoing DB traffic to CC Database and all outgoing traffic to CC Application.
- Select the
CC Load Balancersecurity group from the list. - Click the Inbound Rules tab and click Edit.
- Choose SSH (22) for the type, enter
0.0.0.0/0for the source, and enterSSHfor the description. If possible, restrict this to only the IP address for your machine or the IP address range for your company’s network. - Click Save.
- Click the Outbound Rules tab, and click Edit.
- Click Add another rule.
- Choose ALL Traffic for the type, choose
CC Applicationfor the destination, and enterAnsible to CC app trafficfor the description. - Click Add another rule.
- Choose MySQL/Aurora (3306) for the type, choose
CC Databasefor the destination, and enterAnsible to CC DB trafficfor the description. - Click Save.