Deploying Content Controller
The best way to deploy Content Controller is to start with a blank server, provision it with the Ansible scripts, image it, and then deploy as many servers as you need from that image. This makes rollbacks easier, ensures you have a reproducable server state, allows you to setup an auto-scaling group later on, and in many cases will allow you to do 0 downtime upgrades. If you’re using Amazon Web Services, we’ve provided a playbook to automate this task for you. Unless you have a really good reason not to, you should use this method.
Running the Build AMI Playbooks
build_ami.yml will
- Generate an SSH key pair for Ansible to use (if needed)
- Create a blank Ubuntu instance and provision an Ansible user with sudo powers
- Run the Ansible playbooks against it
- Run database upgrades against your production DB (this can be turned off if needed, but you’ll have to run them before deploying the AMI)
- Create an Amazon Machine Image of the server
- Destroy the temporary server
Before getting started, we recommend making an image of your RDS instance, so you can rollback if needed. It’s also a good idea to do this during a maintenance window. Before running this playbook, you should have completed all of the steps in this guide, and you should be sure that your group_vars settings are correct.
- Go to the
ContentController-PublicDeployfolder on your Ansible control server. - Run the playbook:
ansible-playbook -e "env=prod" build_ami.yml
Deploying an AMI
Deploying an AMI Manually
Go to Services -> EC2 in AWS.
- Click Instances on the left sidebar, and click Launch Instance.
- Select the *My AMIs tab.
- Click Select beside
ContentController-v.v.v_env_xxxxxxxx(the one corresponding to the AMI you would like to deploy). - Choose an instance size (t2.medium or larger) and click Next: Configure Instance Details.
- Choose
Rustici CC VPCfor your Network,CC Private 1for your Subnet,Disablefor Auto-assign Public IP,Nonefor the IAM role, disable protect against accidental termination, enable T2 unlimited if you’d like, and click Next: Add Storage. - Enter a value for the root volume size (100 GB is probably good) and check Delete on Termination. Click Next: Add Tags.
- Click Add Tag. Enter
Namefor the Key andCC Appfor the Value. Click Next: Configure Security Group. - Choose Select an existing security group and check the box beside the
CC Applicationsecurity group you created earlier. - Click Review and Launch.
- Click Launch.
- Select Choose an existing key pair and select the
rustici-cckey pair that you created earlier. Check the I acknowledge… box, and then click Launch Instances. - Select the instance in the Instances list and in the Description tab, copy the Private IP address.
- Repeat steps 1-12, but this time choose
CC Private 2for your Subnet. This way you’ll have at least 1 server in each availability zones. - Click Target Groups on the left sidebar and select your
cc-prod-target-group. - Click on the Targets tab, and click the blue Edit button.
- Select the 2 (or more) application servers that you just launched, click Add to registered, and click Save.
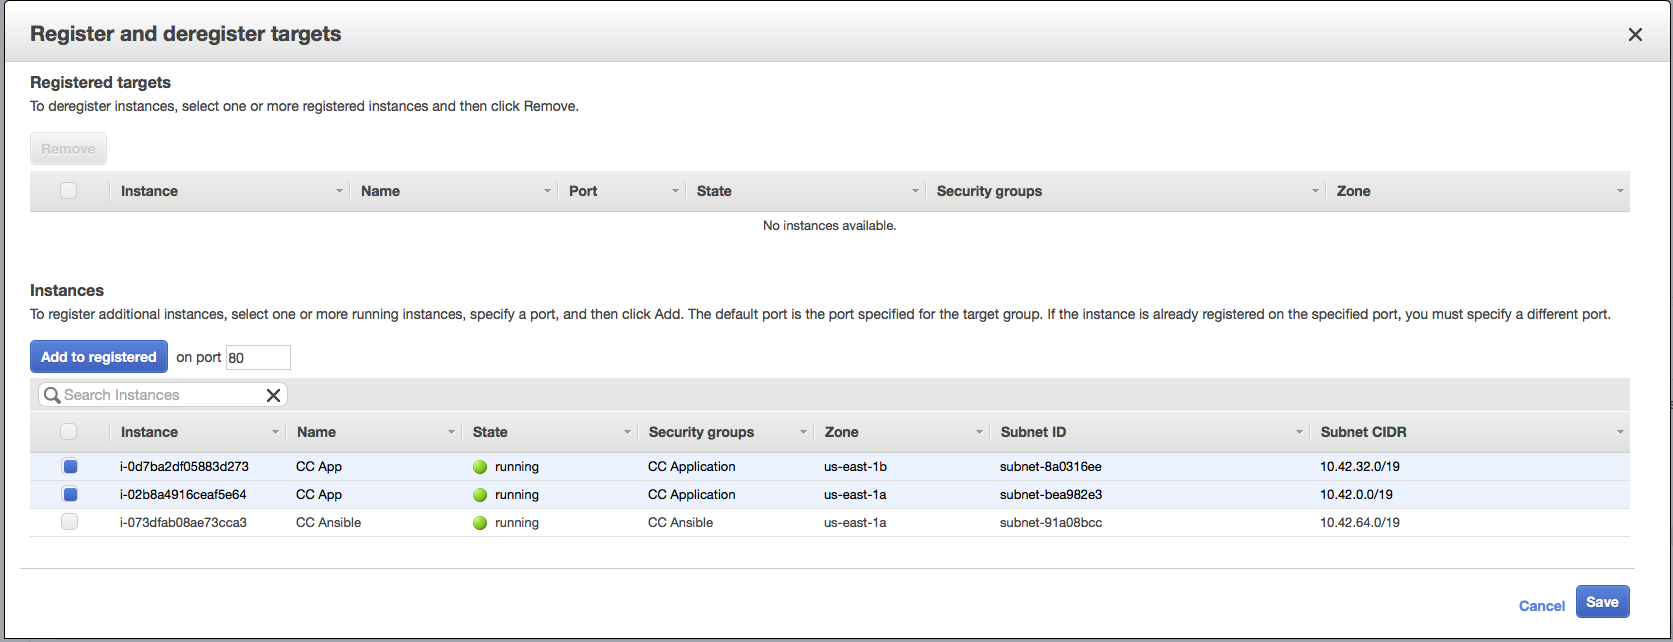
- Once you’re sure your servers are up, click Edit again, check the boxes beside the old app servers, click Remove, and click Save.
- Go back to Instances and either stop or terminate your old app servers.
Deploying an AMI with Auto Scaling Groups
If you’re using AWS EC2 auto scaling, you can create a launch configuration with your newly built Amazon Machine Image. Typically, you would have 2 auto scaling groups (maybe a blue group and a green group) that register their EC2 instances in your load balancer’s target group. When you’re upgrading, you can apply a new launch configuration to the inactive auto scaling group, and change your policies to scale it up from 0 instances to X instances. Once the new group’s instances are reporting healthy, you can set the previous auto scaling group to scale it down to 0 instances so that it takes the old application servers out of service. This gives you an easy way to roll out with no downtime, and an easy way to rollback if something goes sideways.
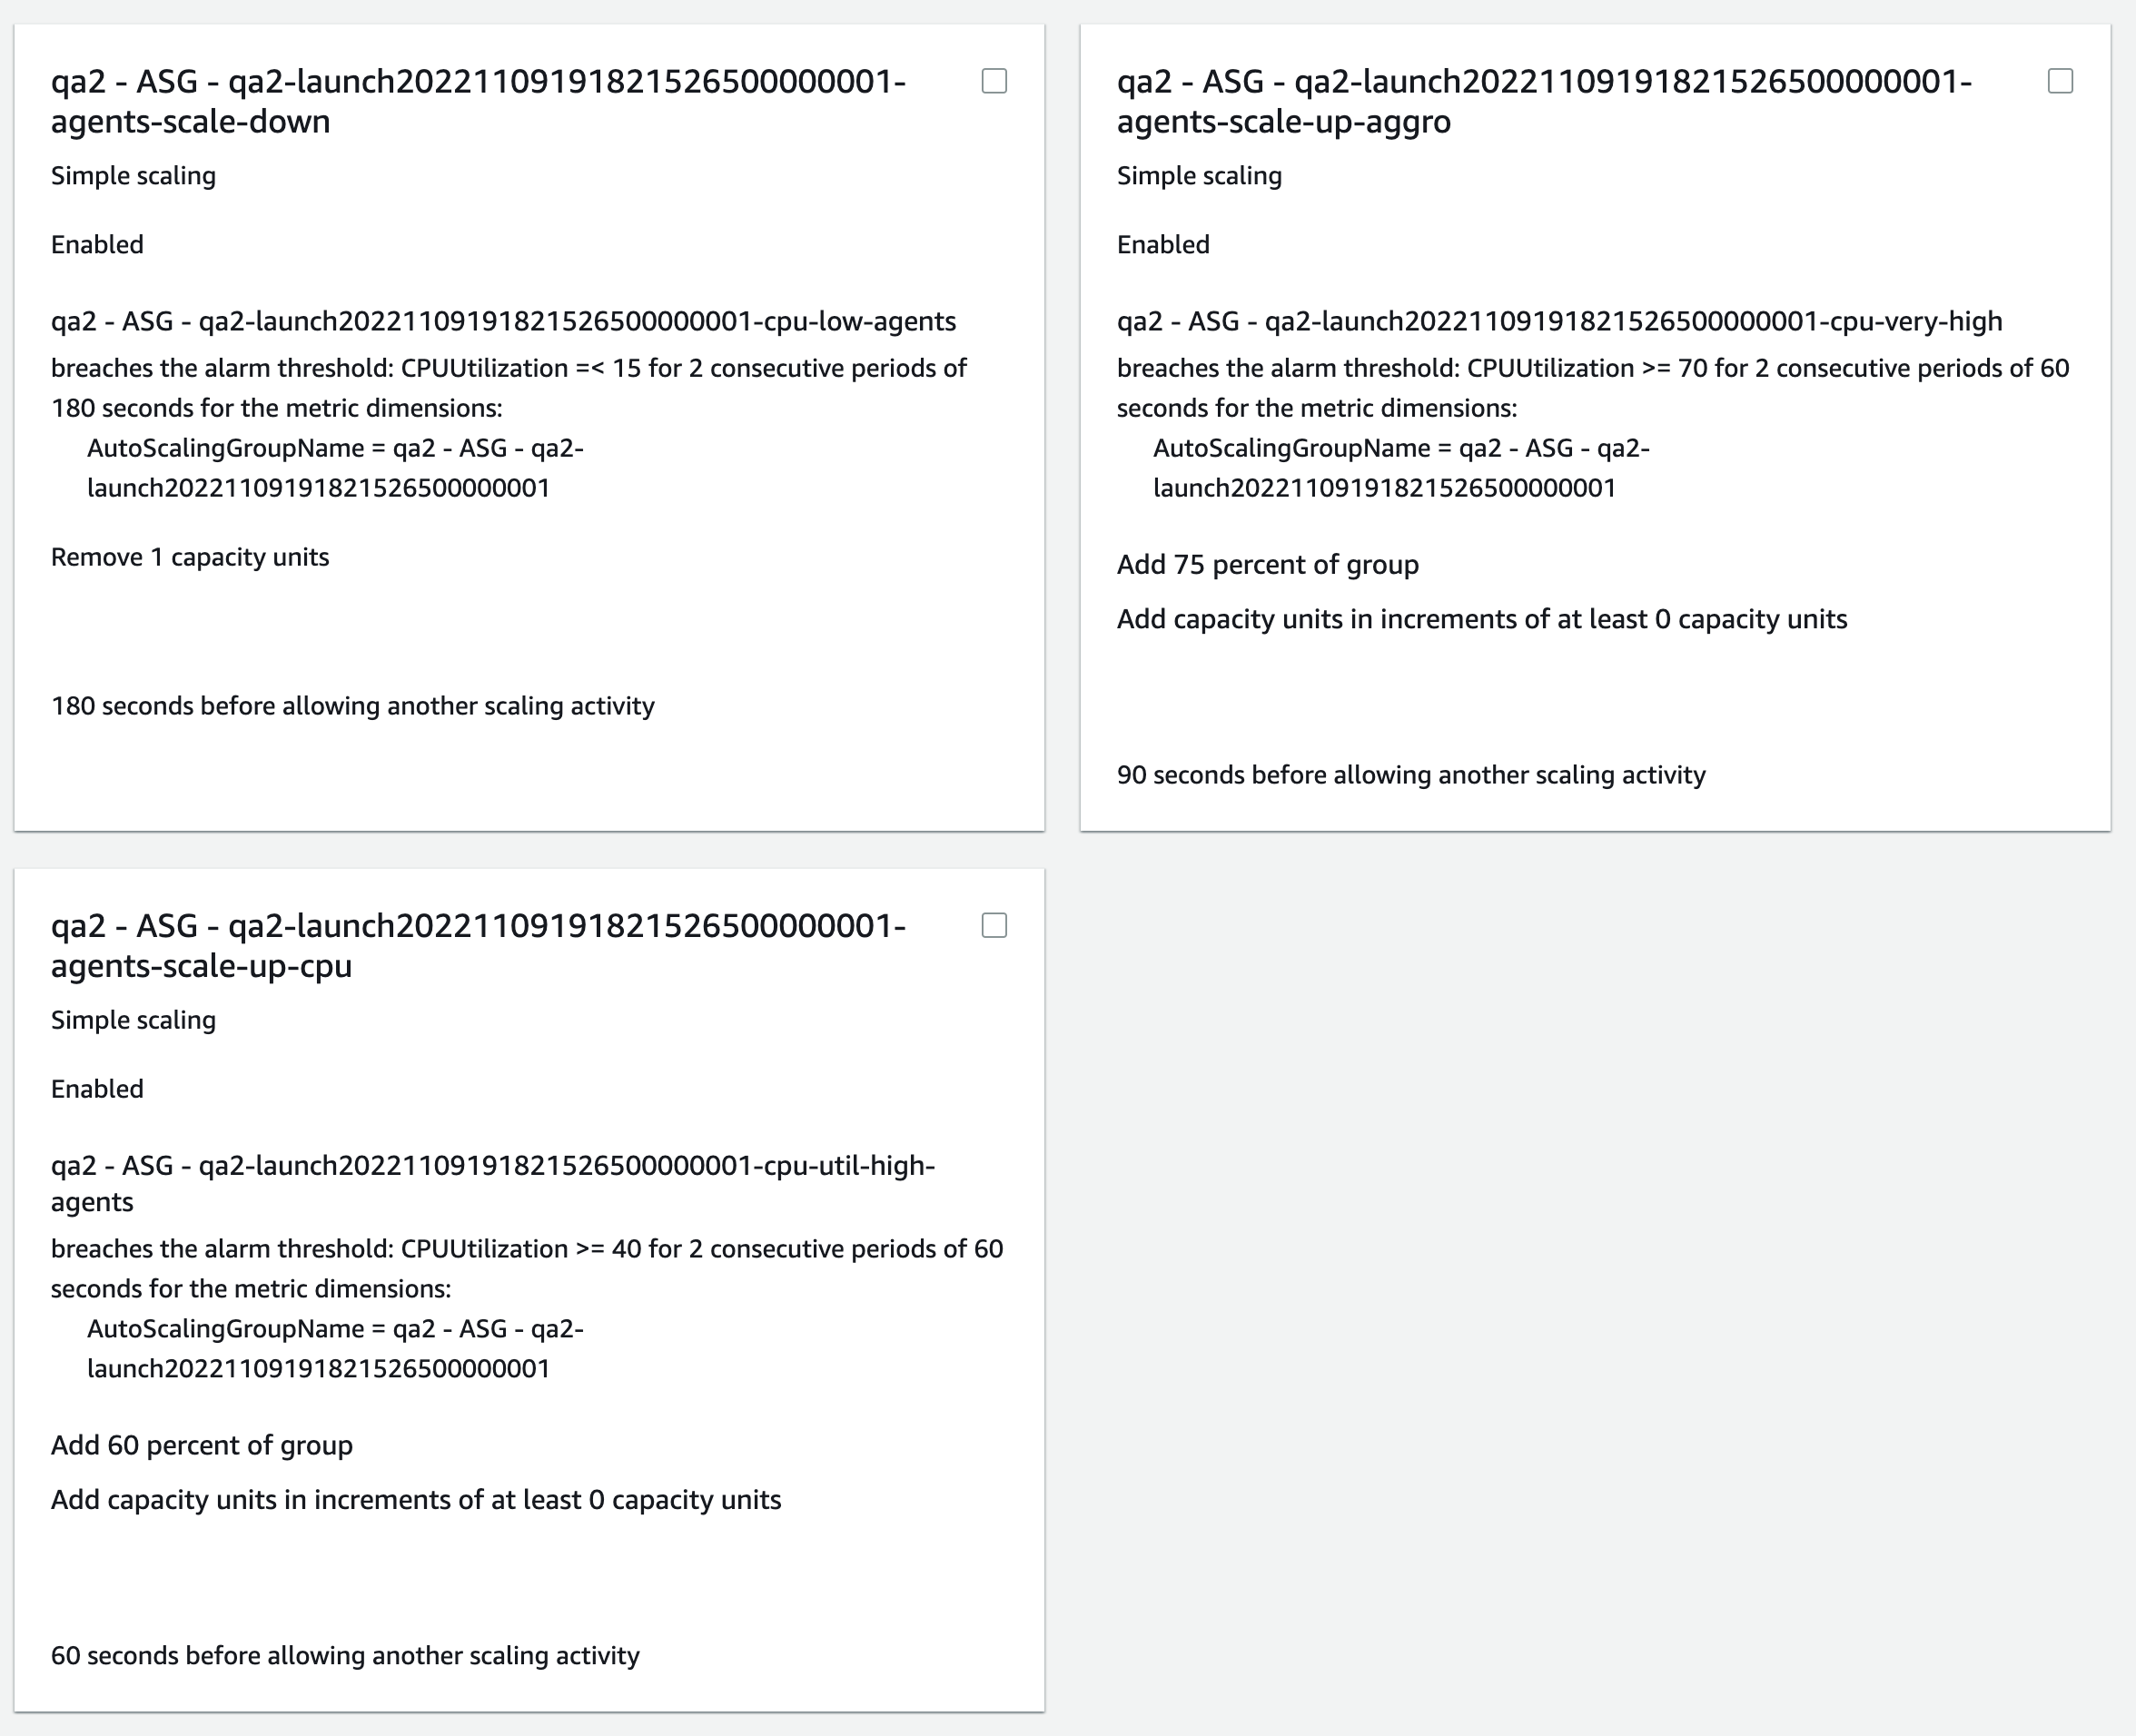
Our MH team has some CloudWatch alarms in place that are monitoring the average CPU utilization of the entire ASG. In order to monitor the average CPU utilization of the entire ASG, you will need to enable ASG metrics when creating the group. Here are the configurations our MH team uses for their ASG rules:
Auto scaling can be complicated to get configured correctly, so if you’re going to set it up, give us a call. Based on your unique environment, we can give you some rules to use as a starting point.
Alternative Deploy Method
Deploying Straight to Static Server(s)
If you’re using bare metal or you just really don’t want to build AMIs and deploy them, then you can run the playbooks directly against the application servers. Note that you should still make a backup of some sort, and you’ll likely have some downtime.
- Setup your application servers. These should be a base Ubuntu 14.04 or later install. Take note of their IPs, the SSH user name, and the SSH key.
- Go to the
ContentController-PublicDeployfolder on your control server. - Copy
inventorytoinventory.prod. - Edit the inventory and delete the dummy IP addresses replacing them with the private/internal IP addresses of your application servers.
- Run the Ansible playbooks against your production servers:
ansible-playbook --user=YOUR_SSH_USER --connection=ssh --inventory-file=inventory.prod env.yml
Note: you may need to add --ask-sudo-pass or --private-key="~/.ssh/my_private_key.pem" to get SSH to work.
Upgrading to the Latest Content Controller Version
- Take a look at the Release Notes to see if there are any important messages about self-hosting for any of the versions between the one you’re starting on and the one you’re moving to.
- Go to the
ContentController-PublicDeployfolder on your Ansible server. - Create an image of your DB and control server in case something goes sideways during the upgrade.
- Run
git pull, then rungit checkout vx.x.xxxreplacingx.x.xxxwith the version number you are moving to. - Follow the steps above in Running the Build AMI Playbooks and Deploying an AMI to Production or Alternative Deploy Method.
Customizing your AMI
Sometimes, you’ll want to customize the image used for building your application server. A good use case for this would be to add your own infrastructure monitoring daemons, log aggregation utilities, or server hardening settings.
- Launch an Ubuntu 18.04 EC2 instance.
- Connect to it, install updates (
apt update && apt upgrade -y), and apply your customizations. - Create an AMI of the instance (and take note of the AMI ID once it is complete).
- Terminate the EC2 instance.
- On your Ansible server, navigate to
ContentController-PublicDeployand editgroup_vars/aws.yml. - Set
webami: ami-********towebami: ami-your_custom_ami_id. - Follow the instructions above for running the build AMI playbooks.