EC2 Bastion / Ansible Controller
The first server you will need is a publicly accessible bastion host. This server will go in the public subnet, have a public IP, and be accessible through SSH. You can tunnel through this machine to access your databases, and you can host your Ansible playbooks on this server. You should pay careful attention to make sure this server stays up to date and is well-secured. Make a backup of it once you're finished with the initial setup. It will contain your application secrets, passwords, and configs.
Go to Services -> EC2
Create an Instance, Security Group, and Key Pair
- Click on Instances on the left sidebar and click the blue Launch Instance button.
- Click Select by the instance type to use. Any linux should work for this box, but we recommend Ubuntu Server 18.04 LTS (HVM), and the rest of these instructions (such as bootstrapping) will assume that is the instance type you chose.
- Choose t2.micro as the instance type, and click Next: Configure Instance Details.
- Choose
Rustici CC VPCfor your Network,CC Public 1for your Subnet,Enablefor Auto-assign Public IP,RusticiCCAnsibleRolefor the IAM role, enable protect against accidental termination, enable T2 unlimited if you'd like, and click Next: Add Storage.
WARNING: Be aware of what you're doing here! By attaching credentials (RusticiCCAnsibleRole) to this instance that have the power to create IAM roles, servers, etc, if this machine is compromised, the attacker will have the ability to create new user accounts and do anything they want in your AWS account. Make sure you keep this server secure!!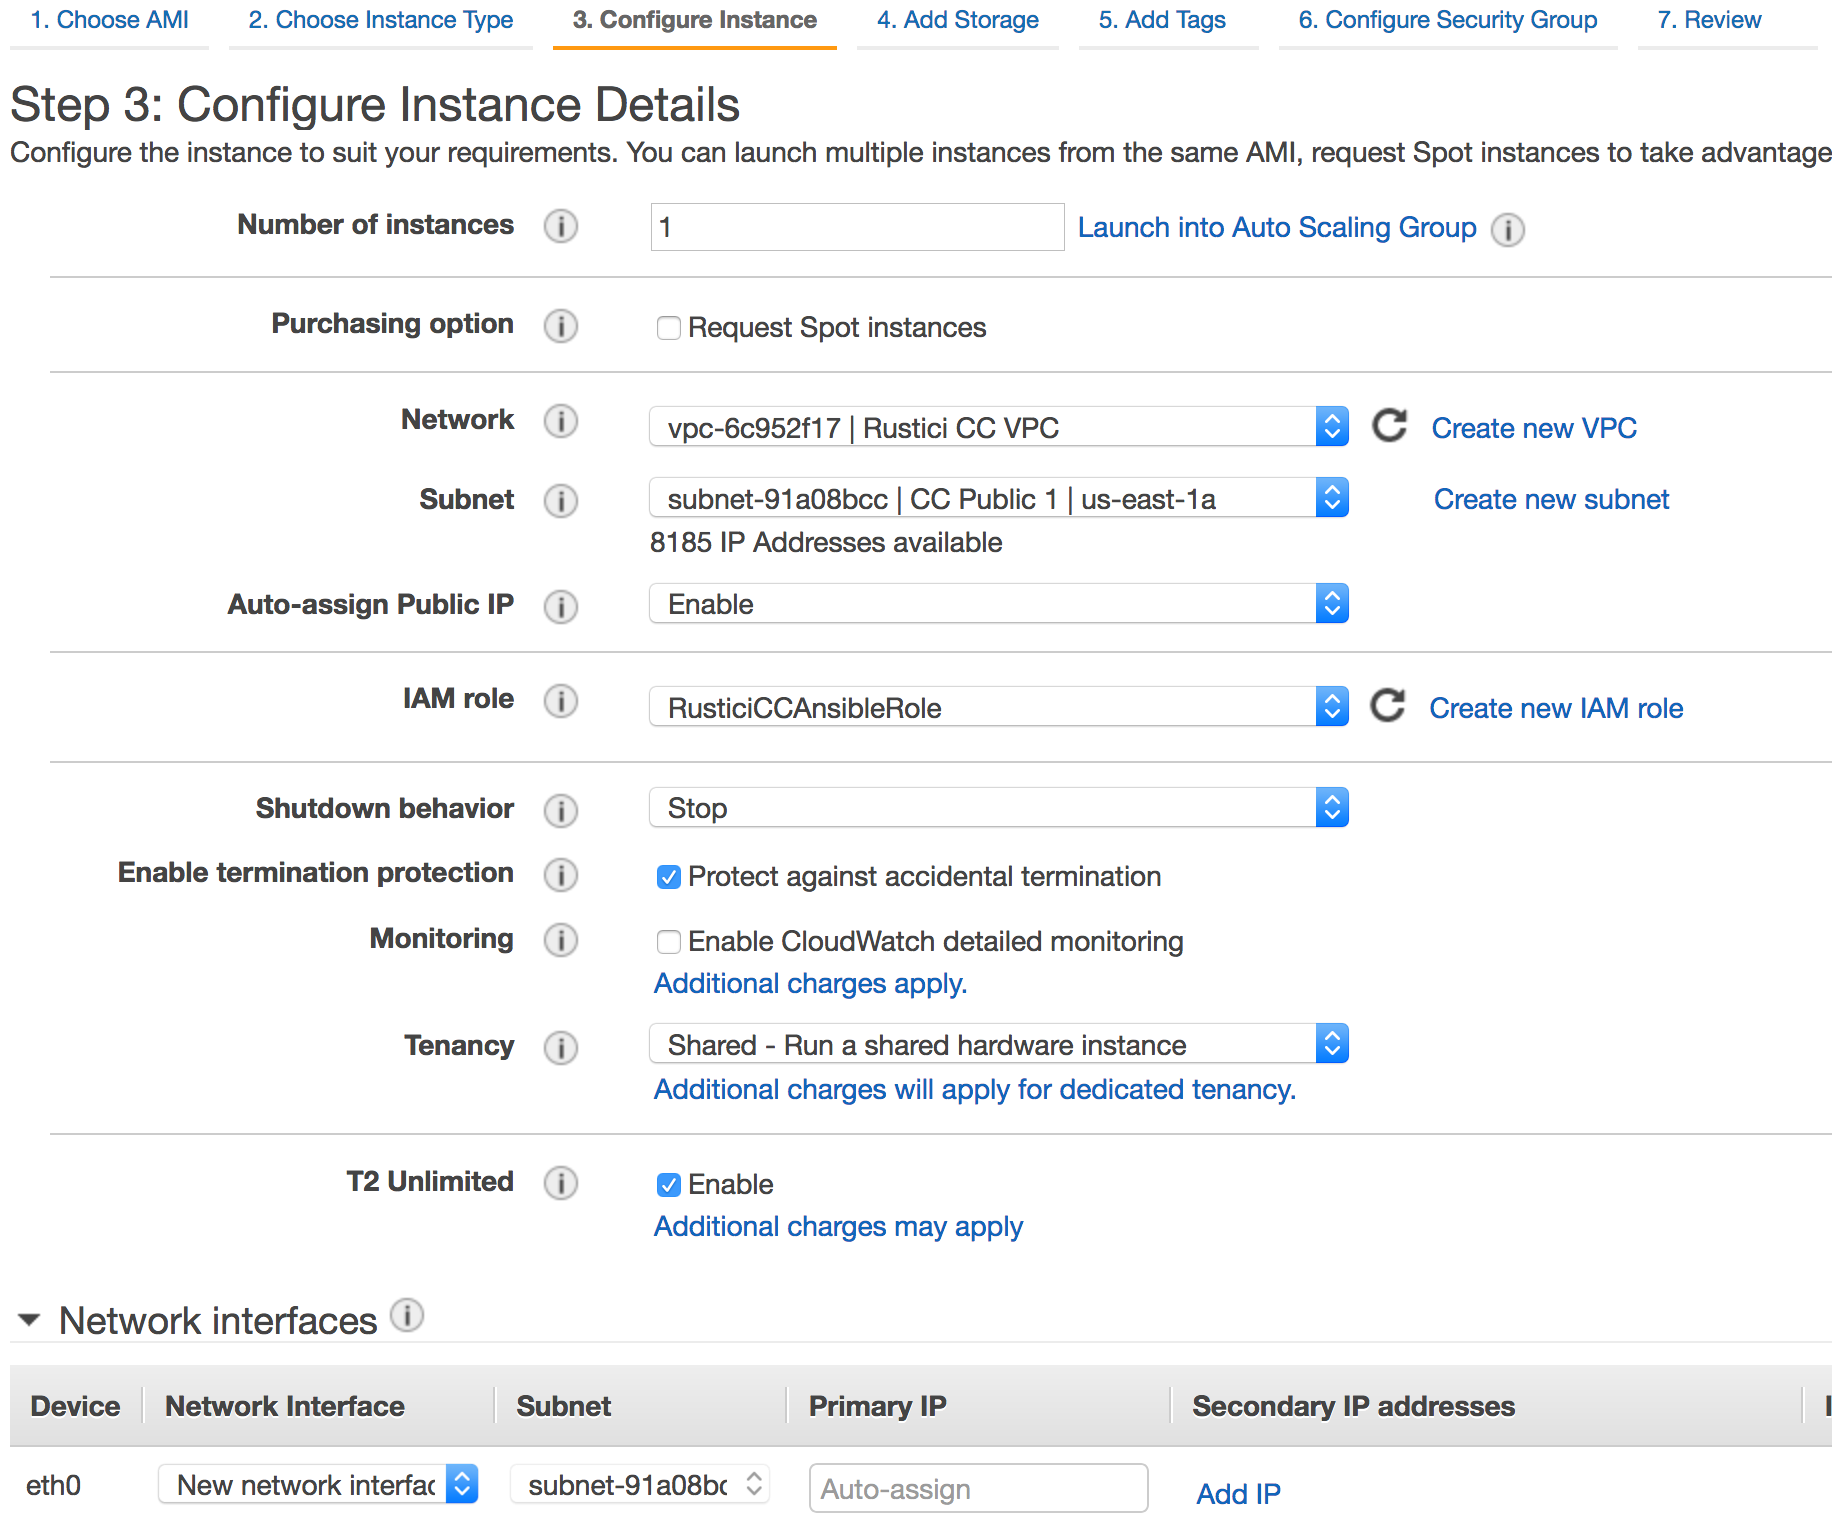
- Enter a value for the root volume size (16 GB is probably good) and uncheck Delete on Termination. Click Next: Add Tags.
- Click Add Tag. Enter
Namefor the Key andCC Ansiblefor the Value. Click *Next: Configure Security Group. - Choose Select an existing security group and check the box beside the
CC Ansiblesecurity group you created earlier. - Click Review and Launch.
- Click Launch.
- In the dialog choose Create a new key pair and name it
rustici-cc. Click Download Key Pair. Save this key pair in a safe, private place, and back it up. You can't get into this server without it. - Click Launch Instances.
- You should see your new
CC Ansibleinstance in the list of instances. Select it and copy the IPv4 Public IP address from the description tab. This is the IP address you will use to connect to your server.
Create a DNS record in Route 53
If you don't want to remember the IP address to your Ansible control server, you can create an A record for it in Route 53. For our demo, we'll create ansible.demo.contentcontroller.net.
- Go to Services -> Route 53.
- Select Hosted zones on the left sidebar.
- Select your domain.
- Click the blue Create Record Set button.
- In the sidebar that appears, enter your desired subdomain Name (such as
ansible), and chooseA - IPv4 addressfor the Type. - Enter the IPv4 Public IP address from step 12 above in the Value box.
- Click Create.
Prepare your SSH key
We're assuming that you are using macOS or Linux for this step. If you are using Windows, please refer to the documentation for your SSH client (such as Putty).
- Copy the
rustici-cc.pemkey pair that you downloaded to~/.ssh/rustici-cc.pem. - Change the permissions by running
chmod 0600 ~/.ssh/rustici-cc.pem.
Bootstrap Ansible Controller
This will download all of the Ansible playbooks for installing Content Controller and install Ansible and its dependencies.
- SSH to your Ansible instance. On macOS or Linux, you can do this by running
ssh -i ~/.ssh/rustici-cc.pem ubuntu@ansible.demo.contentcontroller.net. - Update the server by running
sudo apt update && sudo apt upgrade -y. If you are prompted about updating grub, choose keep the local version currently installed. - Make sure git is installed by running
sudo apt install -y git. - Pick a place to store Content Controller's deploy files, secrets, etc. Your home directory is fine, unless you plan on adding additional user accounts to this machine. Run
cd ~to get there. - Clone the deploy file repository by running
git clone https://github.com/RusticiSoftware/ContentController-PublicDeploy.git. - Go to the newly cloned directory.
cd ContentController-PublicDeploy - Run
sudo ./bootstrap.shto install the necessary dependencies for running the Ansible playbooks.
Bootstrap Content Controller secrets and config
This will generate application passwords, database passwords, and other sensible defaults.
- SSH to your Ansible instance and go to your
ContentController-PublicDeploydirectory. - Run
nano group_vars/keypair.yml. Paste the contents of thekeypair.ymlfile provided for you by Rustici Software. Press CTRL + X to exit, and pressYand then press ENTER to save. - Run
./setup.sh demo.contentcontroller.net, but substitute your own domain. TypeYESto confirm, and press enter.
Edit group_vars
Now, you'll need to set some configuration parameters to match your environment. If you haven't already, take a look at the Deploy Tools to see what the host_vars and group_vars are all about. Then, edit these files as needed for your installation.
If you're following this example exactly, then you'll need to make at least these changes:
group_vars/env.yml
- Change
env: devtoenv: prod - Change
S3FileStorageEnabled: FalsetoS3FileStorageEnabled: true - Change
mysql_root_user: roottomysql_root_user: ccroot - Make note of the
mysql_root_userandmysql_root_password. You will need those when provisioning the RDS instance. - Change
use_ssl: truetouse_ssl: falseandallow_80: falsetoallow_80: true. We'll be terminating SSL at the load balancer. - If your application server does not have exactly 4 GB RAM, then you'll probably need to adjust the heap sizes.