CloudFront
Cloudfront acts like a reverse proxy in front of your Content Controller Server and the S3 bucket that you use for storing course content. For most connections, it just passes the request to your web tier. For requests for course content, CloudFront authenticates the user via a signed cookie that the application generates, and if the user is allowed, it serves up the content from your S3 bucket.
To get started, you need to have completed at least the Certificate Manager, S3, and Load Balancer and Target Group steps in the Deploying in AWS section before this one, and it will be easiest if you have completed all of the steps.
Signing Keys
We use signed cookies to authenticate requests for content that lives in S3. In order to make this work, you’ll need to generate a pair of signing keys and make them available to the application.
- Generate your signing keys per this AWS doc and note the Access Key ID for the keypair.
- Convert the private key to DER format so that Java can read it:
openssl pkcs8 -topk8 -nocrypt -in pk-********************.pem -inform PEM -out pk-********************.der -outform DER
Ansible Config
- Connect to your Ansible server and go to the
ContentController-PublicDeployfolder. - Run
mkdir -p roles/cloudfront/filesto create the files folder, if it doesn't already exist. - Place the
pk-********************.derandrsa-********************.pemfiles (generated above) in theroles/cloudfront/filesfolder. - Edit the
group_vars/cloudfront.ymlfile and make these changes.- Make sure that
use_cloudfrontis set totrue. - Set your Access Key ID (created above) for the
cloudfront_access_key_idvariable. - Add the filename (without the path) for your key files similar to this:
cloudfront_private_key: pk-********************.der
cloudfront_public_key: rsa-********************.pem
- Make sure that
Create your Distribution
Go to Services -> CloudFront
Create a Distribution for Content Controller
- Select the Distributions tab on the left, and click the blue Create Distribution button.
- Under Web, click Get Started.
- For Origin Settings, enter these values
- Origin Domain Name:
cc-load-balancer-*****(choose the load balancer you created earlier) - Origin Path: leave it blank
- Origin ID: should be auto-filled when you select your load balancer above
- Origin SSL Protocols: Select TLSv1, TLSv1.1, TLSv1.2
- Origin Protocol Policy: HTTPS Only*
- Origin Response Timeout: 60
- Origin Keep-alive Timeout: 5
- HTTP Port: 80
- HTTPS Port: 443

- Origin Domain Name:
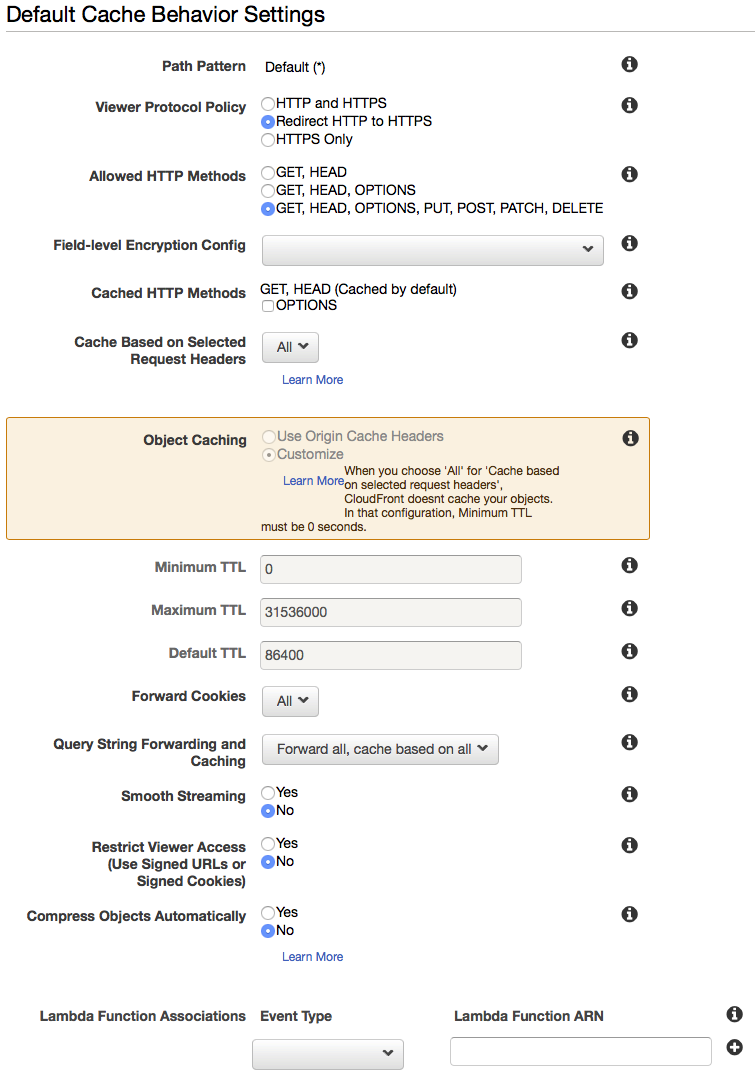
- For Default Cache Behavior Settings, enter these values
- Origin: should be auto-filled when you select your load balancer above
- Viewer Protocol Policy: Redirect HTTP to HTTPS
- Allowed HTTP Methods: GET, HEAD, OPTIONS, PUT, POST, PATCH, DELETE
- Field-level Encryption Config: leave it blank
- Cached HTTP Methods: leave it blank
- Cache Based on Selected Request Headers: All
- Forward Cookies: All
- Query String Forwarding and Caching: Forward all, cache based on all
- Smooth Streaming: No
- Restrict Viewer Access: No
- Compress Objects Automatically: No
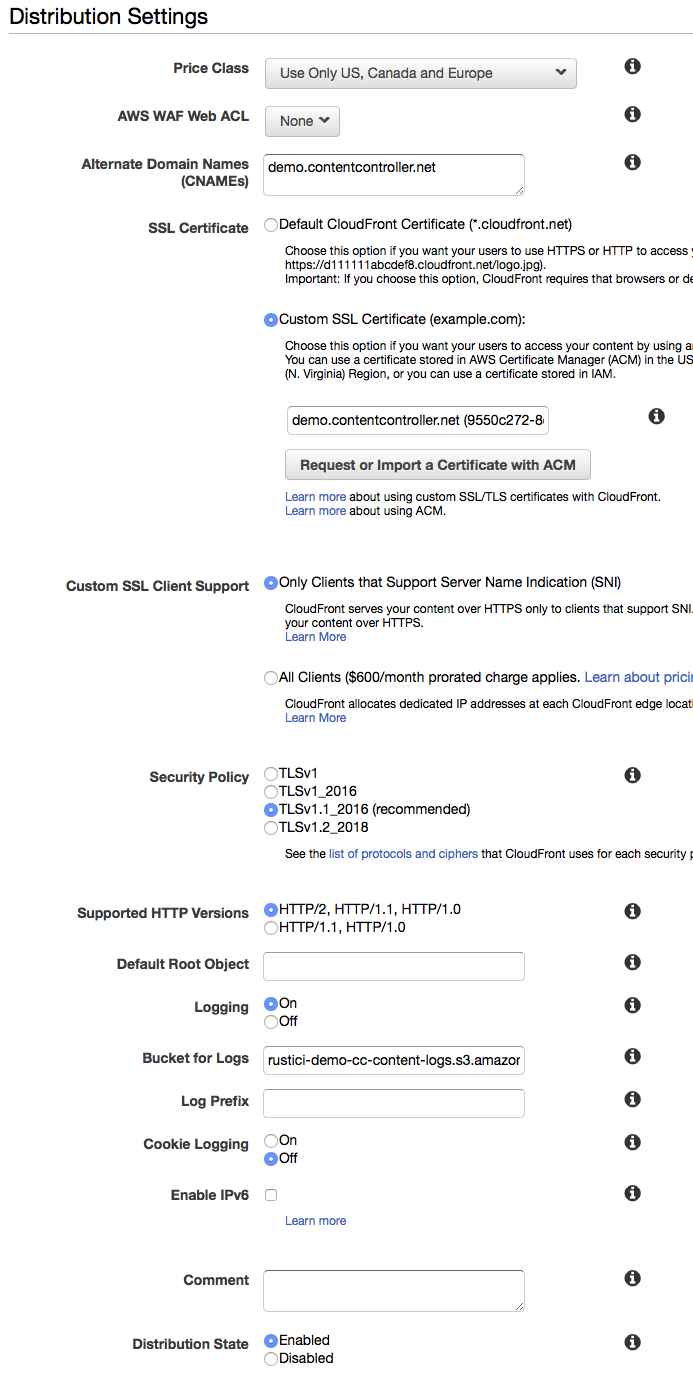
- For Distribution Settings, enter these values
- Price Class: (Choose what you'd like here - we use Use Only US, Canada, and Europe)
- AWS WAF Web ACL: None
- Alternate Domain Names: Enter your cc domain name here (example:
demo.contentcontroller.net) - SSL Certificate: Custom SSL Certificate, and then choose the certificate you created earlier
- Custom SSL Client Support: Only Clients that Support Server Name Indication
- Security Policy: Choose TLSv1 or the TLSv1.2_2018 if you prefer security over browser support. For more details see this AWS documentation on Supported Protocols and Ciphers.
- Supported HTTP Versions: HTTP/2, HTTP/1.1, HTTP/1.0
- Default Root Object: blank
- Logging: On
- Bucket for Logs: Choose the bucket created in the S3 config earlier with the suffix
-logs(example:rustici-demo-cc-content-logs.s3.amazonaws.com) - Log Prefix: cloudfront
- Cookie Logging: Off
- Enable IPv6: Unchecked
- Distribution State: Enabled
- Click Create Distribution.
Create an S3 Origin
- On the CloudFront Distributions page, click the ID of the distribution you just created.
- Click on the Origins tab, and click the blue Create Origin button.
- For Origin Settings, enter these values
- Origin Domain Name: Choose the bucket created in the S3 config earlier with the suffix
-content(example:rustici-demo-cc-content.s3.amazonaws.com) - Origin Path: leave blank
- Origin ID: should be auto-filled when you select the S3 bucket above
- Restrict Bucket Access: Yes
- Origin Access Identity: Use an Existing Identity, then choose the OAI you created earlier in the S3 step
- Grant Read Permissions on Bucket: Yes, Update Bucket Policy
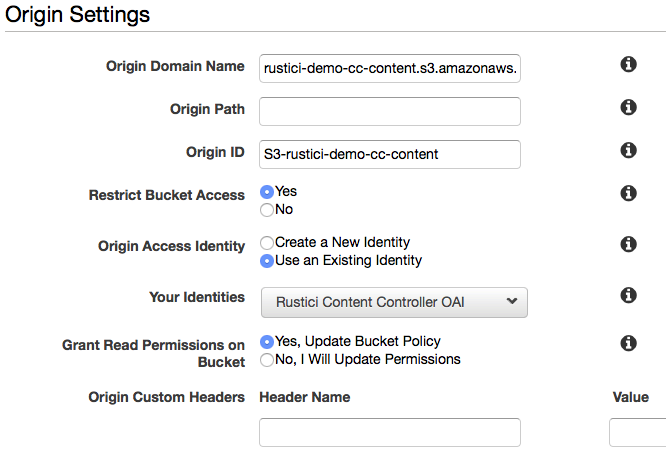
- Origin Domain Name: Choose the bucket created in the S3 config earlier with the suffix
- Click Create.
Create S3 Origin Behavior
- On the CloudFront Distributions page, click the ID of the distribution you just created.
- Click on the Behaviors tab, and click the blue Create Behavior button.
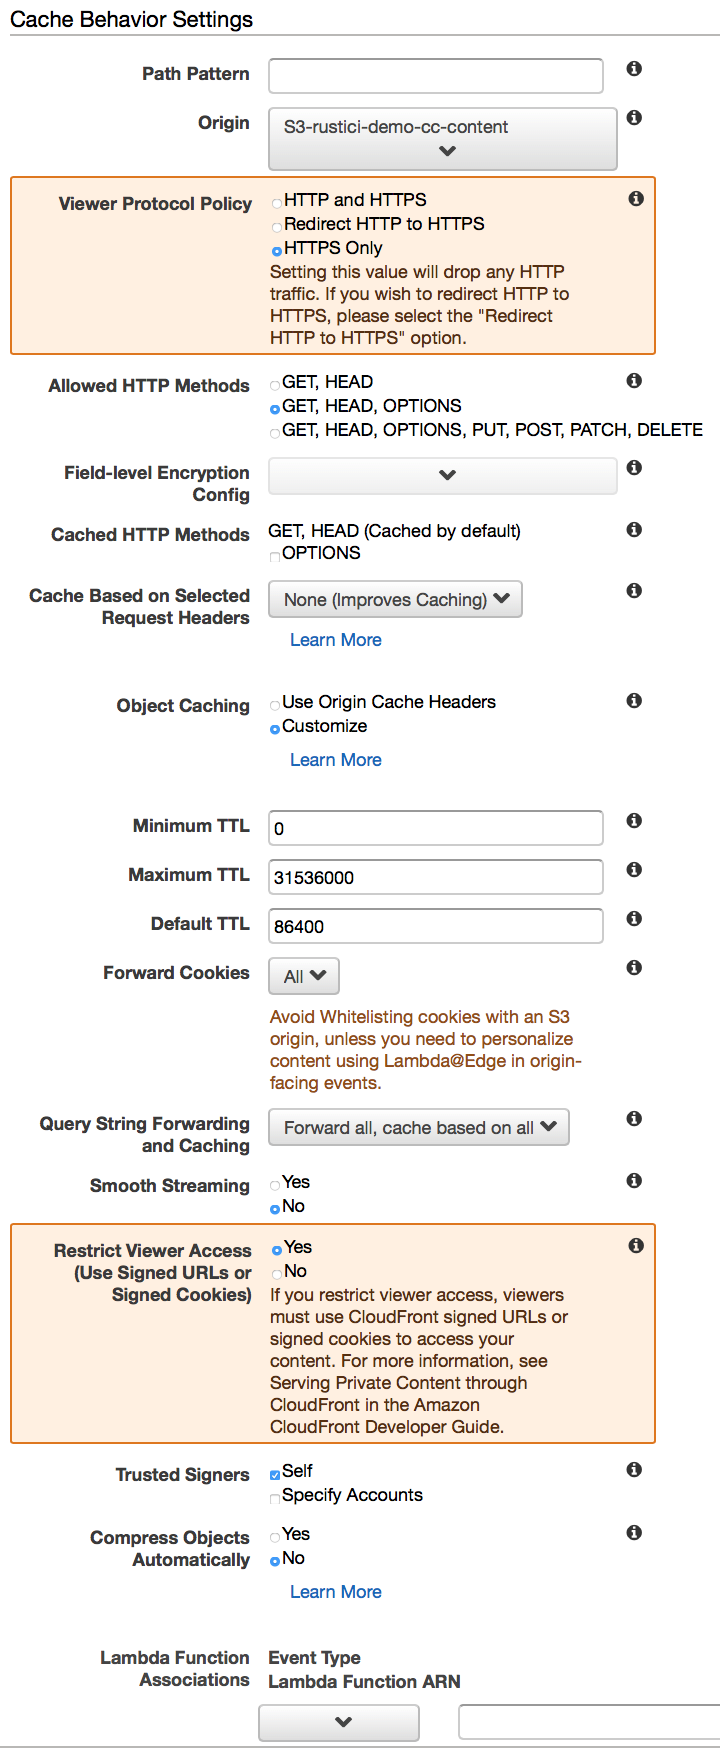
- For Cache Behavior Settings, enter these values
- Path Pattern:
/courses/* - Origin: Choose your S3 origin you created above (example:
S3-rustici-demo-cc-content) - Viewer Protocol Policy: HTTPS Only
- Allowed HTTP Methods: GET, HEAD, OPTIONS
- Field-level Encryption Config: leave it blank
- Cached HTTP Methods: leave it blank
- Cache Based on Selected Request Headers: None (Improves Caching)
- Object Caching: Customize
- Minimum TTL: 1800
- Maximum TTL: 86400
- Default TTL: 14400
- Forward Cookies: All
- Query String Forwarding and Caching: Forward all, cache based on all
- Smooth Streaming: No
- Restrict Viewer Access: Yes
- Trusted Signers: Self
- Compress Objects Automatically: No
- Path Pattern:
- Click Create.
Add CloudFront to Route 53
You'll want to be able to access Content Controller through your own CNAME instead of using the URL for the CloudFront endpoint. To allow that, we'll use Route53.
Go to Services -> Route 53
- Click on Hosted zones on the left sidebar.
- Click on your Public hosted zone created earlier in the Route 53 step. (example:
demo.contentcontroller.net) - Click Create Record Set.
- In the Create Record Set sidebar, enter the following values
- Name: Enter the subdomain you wish to host CC on (example:
cc) - Type: A - IPv4 address
- Alias: Yes
- Alias Target: Choose your CloudFront distribution created above
- Name: Enter the subdomain you wish to host CC on (example:
- Click Create.
Resources
Routing Traffic to an Amazon CloudFront Web Distribution by Using Your Domain Name