Adding Content
Content Controller has a single course library, portions of which can can be shared with accounts for distribution. Courses that have been published as SCORM 1.2, any edition of SCORM 2004, AICC, cmi5, or xAPI (also called "Tin Can" by some authoring tools) can be imported directly into the course library. Some courses that don't conform to a standard can also be distributed using Content Controller, though it takes a bit of extra work. Contact us for more information.
Besides regular courses, Content Controller can also deliver equivalents, which are made up of regular courses with equivalent material presented in different languages. Equivalents can be shared with accounts exactly like regular courses, but when launched they present the learner with a menu of available languages. Selecting a language will deliver the regular course configured for that language.
Content Controller's content management features can be accessed by clicking on the "Content" button on the top navigation bar.

Importing Courses
To import a course into Content Controller, first click on the "Add" button on the right side of the secondary navigation bar while in the Courses section. This will open a dialog with two tabs: one for uploading a packaged course ZIP file, such as you would publish from an authoring tool, and another for server-side courses, which are not covered in this guide.
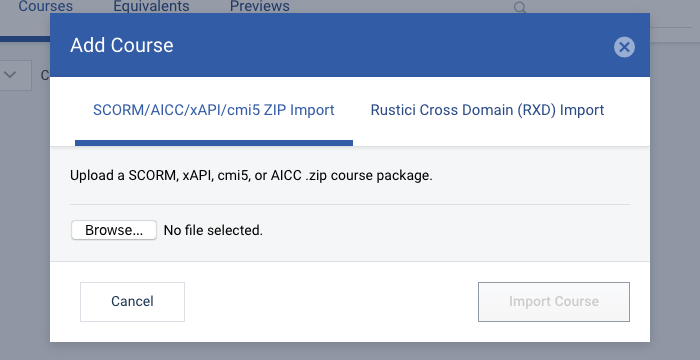
To upload a packaged course ZIP file, click the "Browse..." button and select the file to upload using your browser's file selector dialog. After you have selected a file, click on the "Import Course" button.
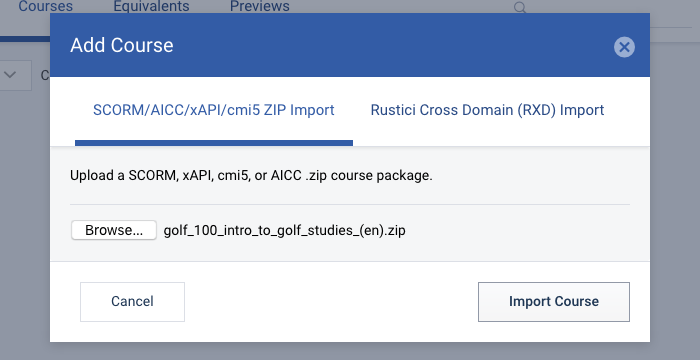
If the import process is successful, the newly added course will appear in the courses list, and its details panel opened.
Course Details
Clicking on a course in the courses list will open its details panel. At the top of the panel are buttons for common actions that you may want to perform on a course. From left to right, these buttons are "Test," for testing the course and adjusting its configuration settings; "Version," for importing a new version of the course; and "Deactivate," for deactivating a course so that it cannot be shared or accessed by learners.
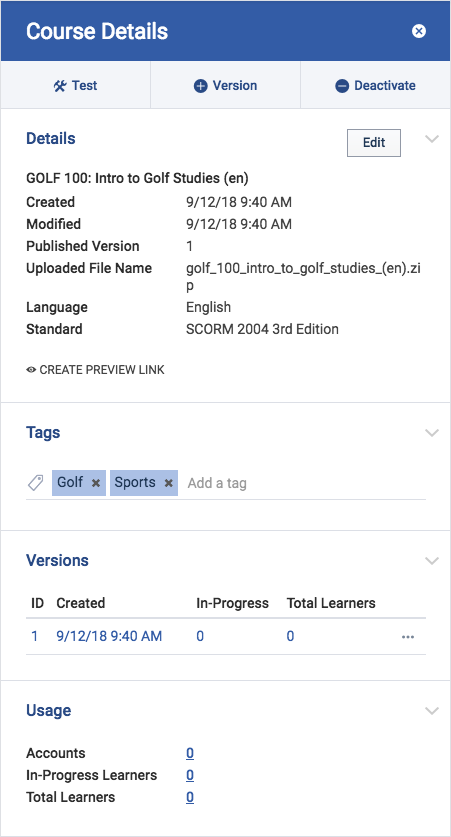
Below the action buttons is information about the course, divided into four sections. These sections can be individually opened and closed by clicking the chevrons along the right edge of the panel. The details section is initially open, and contains the course's metadata. At the top is the course's name, followed by an optional description of the course. The name and description, along with the course's language, are read from the course's manifest file at import time, but they can be changed by clicking the "Edit" button. Beneath the name and description is a list with the following items:
- Created is the date and time that the course was first added to Content Controller.
- Modified is the date and time that the course was last modified.
- Published Version is the version that is delivered when a learner launches the course. You can think of this as the "active" version of the course.
- Uploaded File Name is the name of the file that was uploaded for the published version of the course.
- Language is the primary language of the course's learning content.
- Standard is the learning standard to which the course conforms.
At the bottom of the details section is a button for creating a preview link for the course.
Below the details is the tags section, where you can view, add, and remove tags from the course. Anywhere in Content Controller where you can search for a course by name, you may instead search for courses with a particular tag. This includes searching the courses list, sharing content with an account, and selecting a course for a report.
To add a tag to a course, click on the "Add a tag" label in the tags section of the detail panel, type the desired tag name, and then press Enter. As you type, tags that have previously been added to other courses will be offered as possible autocompletions. Tag names must be between 3 and 25 characters in length. To remove a tag from a course, click the "x" to the right of the tag's name.
The next section of the course details panel is versions, which contains a list of all versions of the course that have been imported into Content Controller. The published version of the course (i.e., the version that is delivered to learners) is highlighted in blue. The list includes version IDs, creation dates, the number of in-progress learners, and the total number of learners who have launched each version. Clicking the ellipsis ("...") on the right side of a row will open a drop-down menu with actions that can be done with that version.
The last section is usage, which has the following items:
- Accounts is the number of accounts the course has been shared with. Clicking the number will show the list of accounts, with the number of learners for each.
- In-Progress Learners is the the number of learners who have launched the course, but have not yet completed, passed, or failed. This number does not include learners who launched the course as part of an equivalent. Clicking the number will show a breakdown of in-progress learners by account.
- Total Learners is the number of learners who have launched the course, excluding those who launched it as part of an equivalent. Clicking the number will show a breakdown of learners by account, just like clicking the number of accounts.
- Equivalents is the number of equivalents that the course is a part of. Clicking the number will show the list of equivalents, with the number of learners who have taken the course as part of each. This item is only visible if the course has been added to an equivalent.
Versioning Courses
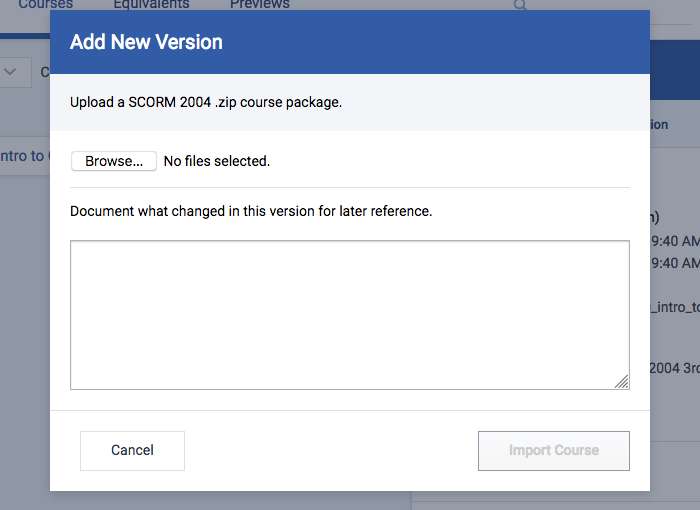
Course versioning in Content Controller is a three-step process. First, you create a new version by importing the updated course ZIP file, then you test the changes, and then you publish the version to make it available to learners.
To create a new version of a course, click the "Version" button in the course's detail panel. You will be prompted to upload a new ZIP package that conforms to the same standard as the original version of the course. You may also include a message documenting the changes made in the new version.
After clicking the "Import Course" button, if the import process is successful, you will be given the option to test the new version of the course, by launching it in a sandbox environment. You can also test the new version by using its drop-down menu in the course's detail panel.
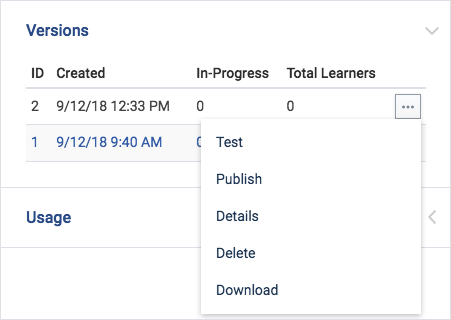
Besides testing the version, the drop-down menu also allows you to publish the version, view and edit details about the version, and to download the course ZIP package. Until the course is published, you can also delete it.
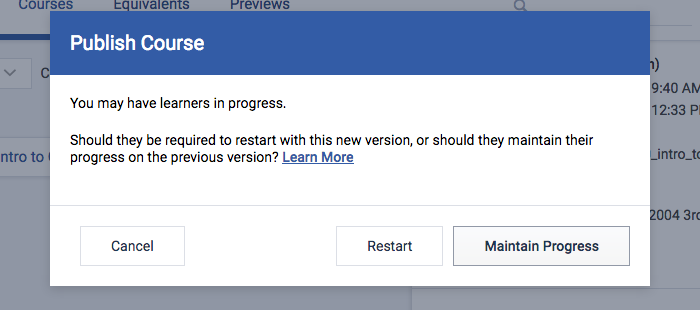
When you publish a version, it will be the version of the course that is delivered whenever a new learner launches it from their LMS. For learners who are still in progress, you have the option of either restarting them on the new version, or allowing them to continue on the version they started. Restarting learners on the new version is appropriate if there are significant changes or corrections to the course material. Allowing learners to maintain their progress on a previous version is appropriate for more trivial corrections, such as fixing typos or replacing images.
Creating Equivalents
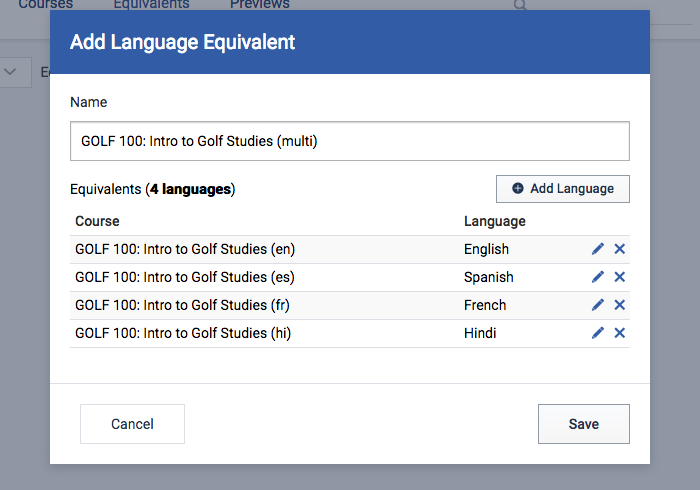
To create an equivalent, first click on the "Add" button on the right side of the secondary navigation bar while in the Equivalents section. This will open a dialog with a field for the new equivalent's name, and a button to add a language option to the equivalent.
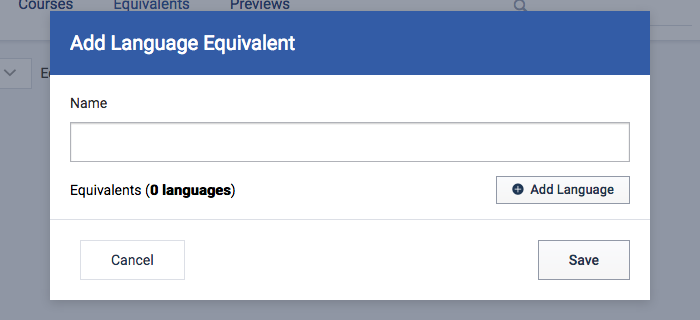
Clicking the "Add Language" button will allow you to select a course and language to add to the equivalent. You can search for a course by name or by tag using the search tool at the top of the dialog. After selecting the desired course, use the language drop-down at the bottom of the dialog to select the language.

As you add languages to the equivalent, they will appear on the list. You can remove languages, or change which course they map to, using the X and pencil icons. When you have finished selecting langauges, click the "Save" button to create the new equivalent.
After the equivalent is created, it will appear in the equivalents list, with its details panel opened.
Equivalent Details
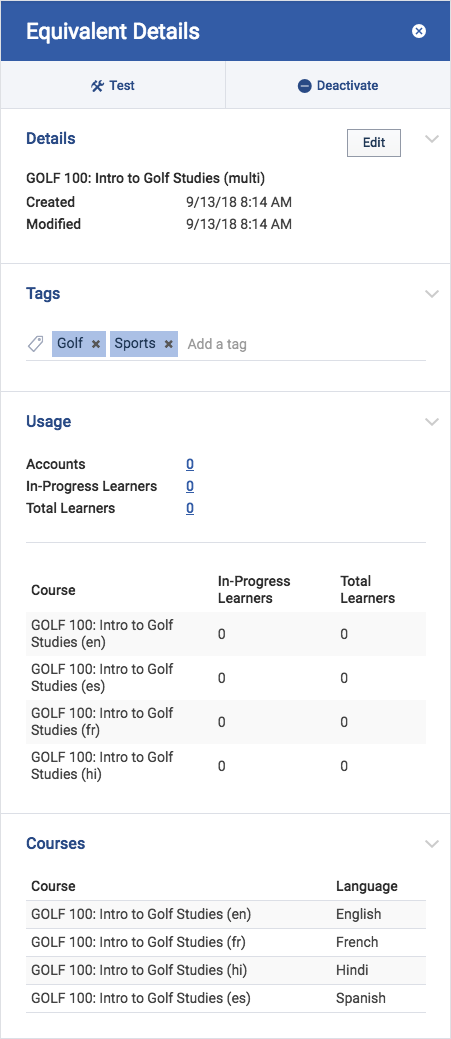
Clicking on an equivalent in the equivalents list will open its details panel. At the top of the panel are buttons to test the equivalent's language selection page, and to deactivate the equivalent so that it cannot be shared with accounts or accessed by learners.
Below the action buttons is information about the equivalent, divided into four sections. These sections can be individually opened and closed by clicking the chevrons along the right edge of the panel. The details section is initially open, and contains the equivalent's metadata. At the top is the equivalent's name, followed by the date and time that the equivalent was created, and the date and time that it was last modified. You can change the equivalent's name, and its list of courses and languages, by clicking the "Edit" button.
Below details is the tags section, where you can view, add, and remove tags from the equivalent. As with course tags, anywhere in Content Controller where you can search for an equivalent by name, you may instead search for equivalents with a particular tag.
The next section is usage, which has the same information about accounts, in-progress leaners, and total learners as the course details panel, but also has a break down of in-progress and total learners for each course in the equivalent.
The last section of the equivalent details panel is courses, and it is simply a list of the courses and languages that make up the equivalent.